Where Can I Upload Wordpress Free for Site Testing
Are you trying to figure out how to make bold changes to your site without affecting your visitors? Or exercise yous want to test out the WordPress platform before you lot purchase a hosting plan? Or peradventure you just want to learn how to utilize WordPress.
This is where WordPress exam sites come in handy! There are different ways to prepare a WordPress test environment, but each one serves a different purpose.
Some methods piece of work just if you have an existing WordPress site while others enable you lot to create a dummy site without owning a domain or hosting plan.
In this step-by-footstep guide, we'll show y'all the dissimilar methods available to create your own WordPress test site earlier going live according to your needs.
TL;DR –
At that place are many ways to set up a WordPress test site, but the easiest one is to use an efficient WordPress Staging Plugin such every bit BlogVault. Y'all tin can create your examination site in under a few minutes. One time you're happy with your changes, you tin push your changes from staging to live with the click of a push button.
How To Set up Upwardly A WordPress Test Site
It was not also long ago when building a website required a sizeable investment and heavy coding skills. But with the dawn of WordPress, that all changed. Information technology presented to the globe a fast, easy, and affordable style to create a website. It's no wonder information technology shot to fame and has retained its position equally the most pop CMS (Content Management Organisation) platform in the world to date.
Beingness and then pop, there are a number of ways in which you tin can create a WordPress examination site. In that location'due south no single 'best' way to do it simply considering it actually depends on the reason you lot need the WordPress testing site. We've segmented it into two chief motives:
- Create A Test Site Using Existing WordPress Site to test out major changes such equally WordPress updates or trying new plugins and themes.
- Create A Test Site Without Existing WordPress Site to experiment with the WordPress platform, run quick tests, or to improve your WordPress skills.
Let's get started.
A. Set Upwards A Test Site To Make Changes To Existing WordPress Site
When you've built and managed a WordPress site, you'll know how frail it is. Making changes to your site don't e'er turn out the way you expected. You can brand smaller changes directly to your live site such every bit publishing a weblog mail.
But when information technology comes to major changes such as switching your site theme or installing a plugin to add together new functionality, they have the potential to pause your site.
In times similar these, a WordPress examination site, more popularly known every bit a staging site, comes to the rescue. A exam WordPress site enables you to experiment with your changes earlier making them on your alive site.
There are a bunch of ways you can set upwardly a WordPress examination environment. We take an extensive guide on different ways to ready a WordPress staging site. Hither, we'll focus on two options:
- Using the BlogVault Plugin which is an easy-to-use selection that's reliable, guaranteed to work accurately, and doesn't cost a dime.
- Setting it up manually through cPanel which is time-consuming and requires technical knowledge.
Note: You tin can employ these methods to clone your existing WordPress website to fix a test environment. If you don't have a live WordPress site and desire to set up a dummy WordPress test site, skip to this section.
one. Create A WordPress Exam Site Using The BlogVault Plugin
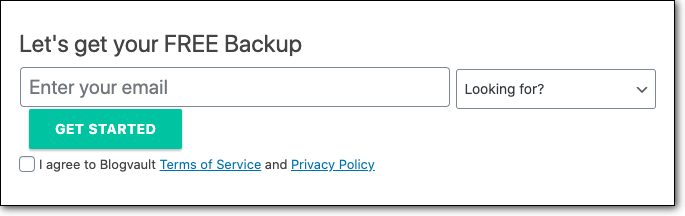
Footstep 1: Download the plugin called BlogVault on your WordPress site and actuate it.
Stride 2: Access the plugin on your WordPress console and enter your email accost. From the drop-downward menu Looking For?, select Staging and Get Started.
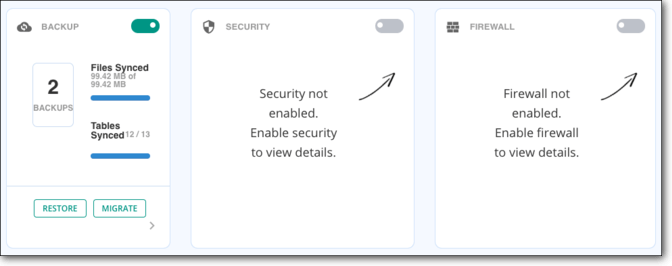
Step iii: You volition be redirected to BlogVault's dashboard where the plugin will sync with your website to create your offset backup. Once complete, you lot'll see your own dashboard similar so:
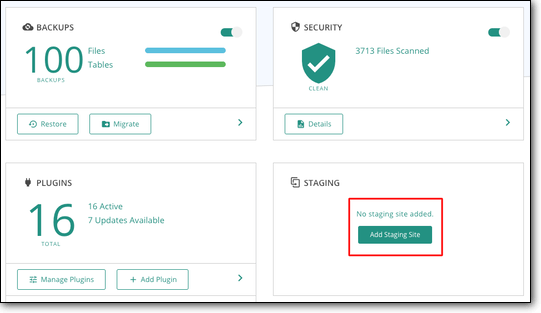
Step 4: Access the section called Staging and set up your first staging site past clicking on Add Staging Site.
Step v: Select the latest backup copy created and Submit to create your testing environment. BlogVault will automatically password protect this site so that it is hidden from visitors and search engines.
One time your staging site is ready, BlogVault will provide you with a username and countersign. Accept note of it, you'll need it in the next step.
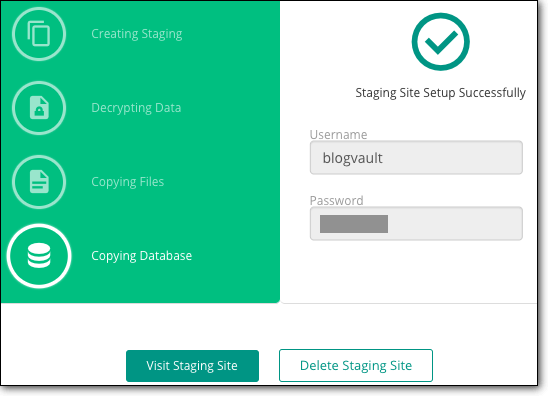
Pace 6: Visit the Staging Site and use the credentials provided to access the site.
Step 7: Finally, to starting time working on your staging site, yous can admission your wp-admin console by calculation 'wp-admin' at the end of the staging site URL.
This site has a validity of thirty days but you can extend information technology if y'all similar. You lot can install plugins or a new theme, and try out major changes to your site. If annihilation goes incorrect here, there's no stress because your live or production site is contained of this test site and will not be affected.
Congratulations! Yous've successfully gear up your WordPress testing site. You can experiment with all sorts of changes without affecting your live surroundings.
ii. Create A WordPress Examination Site Manually
Note: You tin utilise this method to gear up a staging site just if your web hosting provider grants you access to cPanel.
If you are using a Managed WordPress Host, yous almost likely will not have access to cPanel. We recommend using a WordPress plugin to stage your website. (Refer to the steps higher up.)
Before we dive in, we must caution you that setting upwards a testing environment manually isn't for WordPress Beginners. A better selection would be to employ a plugin like BlogVault to automate the procedure for you.
We also don't recommend this method because y'all volition be duplicating the contents of your website on your web server. This means you'll be running two websites on your server. This tin slow downwards your alive website and hamper its performance for your visitors.
That said, if you are peachy on learning how to set up a test WordPress site on your own, we've detailed the steps below.
IMPORTANT: Take a consummate backup of your WordPress site. This method requires you lot to access the backend of your WordPress site and carries a certain amount of risk. In instance of any mishap, you can employ your backup to restore your site to normal.
Footstep 1: Create A Subdomain
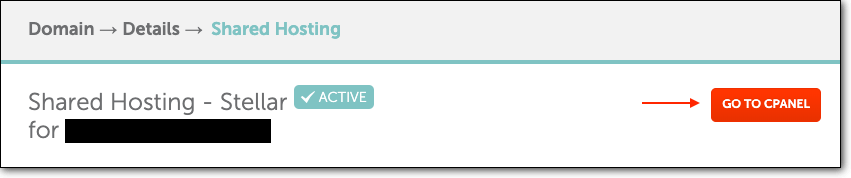
Log into your web hosting business relationship and access cPanel. Inside, you'll run across an option of Subdomains.

Inside, create a subdomain named Staging, like and then:

Pace 2: Download Files And Database Of Your WordPress Site
one. Download WordPress files
Later you've installed WordPress to create your site, a number of files and a database will be created for your site. You lot need to admission these files and database to create a test site.
To admission your WordPress files, go to cPanel > File Manager. Here, look for a folder chosen public_html.

Select this folder, correct-click and Compress information technology. This volition create a null file of your website's files. Once the nada file is ready, right-click and Download it.
We recommend creating a folder to shop WordPress locally on your computer chosen Staging. Put this WordPress nada file in this folder for easy access.
2. Download WordPress Database
Now to become a copy of your database, become to cPanel > phpMyAdmin. Hither, select your database and Consign it.
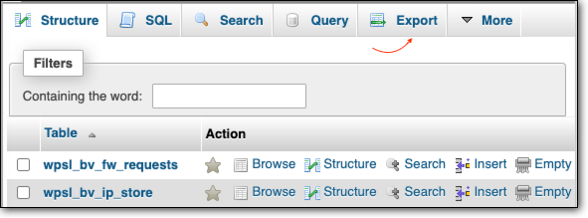
On the next page, leave the default settings as Quick method and SQL format and click on Go. A .sql file will download to your computer, save it to the aforementioned Staging binder you created in the previous stride.
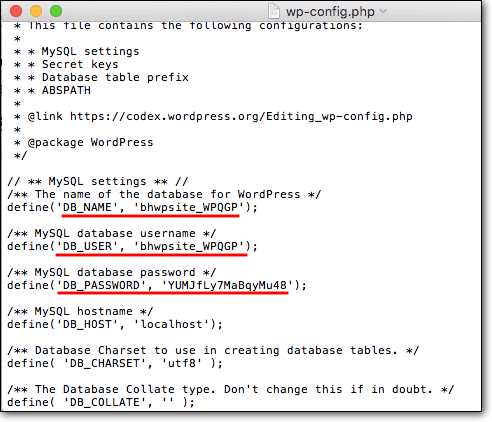
PRO TIP: If you run across multiple databases and don't know which is your website's database, y'all can become to File Manager > public_html. Hither, locate your wp-config.php file. Right-click and Edit this file. Here, y'all'll see your database proper name and countersign, like so:

Footstep 3: Upload WordPress Files And Database To Your Staging SubDomain
1. Upload WordPress Staging Files
To set upwardly your subdomain as a clone of your live site, you need to upload your website'southward files and database to this subdomain folder.
Access cPanel > File Managing director > public_html. Here, select the Staging folder you lot created every bit a SubDomain. Inside this folder, select Upload, choose the naught file of your WordPress files on your local computer and upload it hither.

Once uploaded, correct-click, and unzip the file. Post this, you can delete the zip file.
ii. Upload WordPress Staging Database
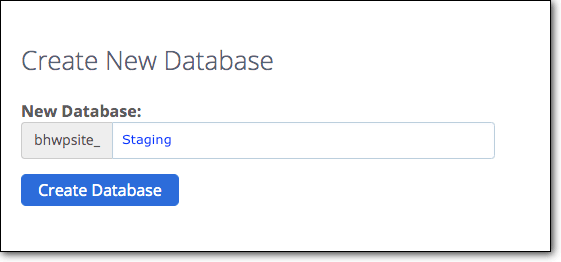
Go back to cPanel > phpMyAdmin > Databases. Here, Create A New Database.
After this, scroll downward on the aforementioned page and create a MySQL user for your database. Continue a note of your database and MySQL user data, you'll need information technology in the adjacent step.
Now, become to cPanel > phpMyAdmin > Databases. Select the new database you lot merely created and select Import. Select the database you downloaded and stored on your computer.
Stride three: Update Database Details In The wp-config File
We mentioned earlier that your wp-config file contains your database data. The wp-config file uploaded contains your erstwhile database information. You lot need to update it to match the WordPress database you only created.
Navigate to cPanel > File Managing director > public_html > Staging. Correct-click on the wp-config file and Edit information technology.
Here, edit the post-obit lines and enter your new database details.
To access your site, y'all need to apply the URL staging.yourdomain.com. Replace 'yourdomain' with the name of your website. The login credentials to wp-admin panel will remain the same as your live website.
It's important to remember that since you created this test site manually, you also take to delete it manually. Every bit we mentioned before, running two websites on your web server tin can dull down your live WordPress site. So, once y'all're done using this website, we strongly recommend deleting it immediately.
B. Set up a Examination Site to Experiment With WordPress
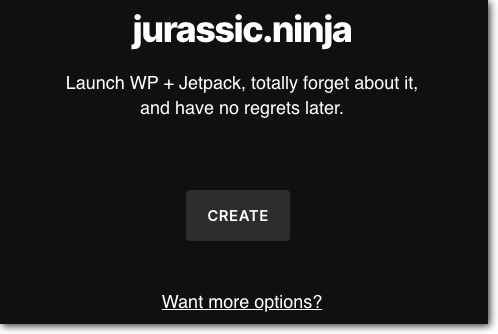
If you're looking for a quick and easy way to ready a temporary test WordPress environs, try jurassic.ninja.
It's a cloud-based software that'due south uncomplicated to use. For those who are test driving WordPress, this is the perfect solution.
Note: jurassic.ninja creates a fresh WordPress installation. It does not clone your existing WordPress site to run tests.
Step one: Visit the jurassic.ninja website and select Create.
Step 2: jurassic.ninja will prepare your WordPress installation. It will only have a minute. Adjacent, select the pick The new WP is ready to go, visit it!

That'southward it! Your dummy WordPress site is ready. The username and countersign to admission this site are displayed on your WordPress dashboard. Take note of information technology and keep it safe to access this site again.
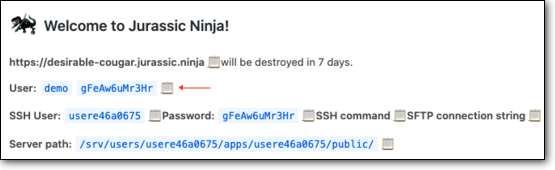
This site volition be deleted after 7 days, so ensure you consummate all your testing before it disappears.
Now that you've successfully created your WordPress exam site, we'll show you how you can move your changes from your test environment to your live site.
How To Motility Changes From WordPress Test Site To Live Site
Nosotros'll show you how to move your changes from your WordPress test site to live site for all 3 methods we covered above:
i. Merge Changes Using The BlogVault Plugin
Once y'all're completely satisfied with the changes yous've made on your live site, BlogVault has a nifty feature called Merge. This saves you the trouble of recreating all your changes on your live site.
Earlier you proceed, nosotros strongly recommend testing your WordPress site's performance and loading time. Ensure your staging site performs well and but then move your changes to your live site.
To push button your changes from your testing surround onto your live website, follow the steps below:
Step 1: Visit the BlogVault dashboard and select Staging.
Pace 2: Select Merge to Source. BlogVault will start syncing your live site and your staging site to determine the differences.
Stride 3: On this page, you can view a listing of all the changes y'all made. You can choose to merge all changes or select the changes you want to merge to your live WordPress site.
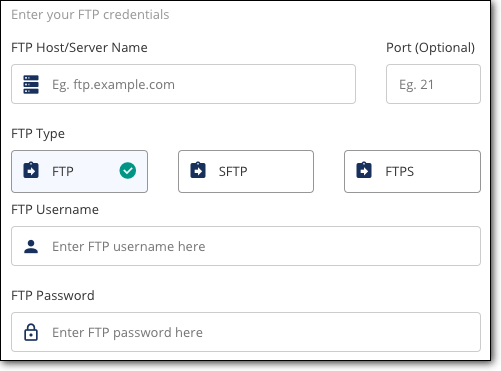
Step 4: Next, BlogVault requires permission to admission your website'due south server in social club to merge your staging site with your live site. To grant admission, enter your FTP or SFTP credentials. You tin go your FTP credentials from your spider web host or apply our guide to Finding Your FTP Credentials.
Step 5: Select the folder in which your WordPress live website resides. This is usually public_html unless you've created a separate folder for your website.
That'south it. It volition accept a few minutes for BlogVault to automatically push the changes you lot made on your staging site onto your live site.
Once complete, BlogVault volition notify you lot. Nosotros recommend checking your website to ensure all the changes take been implemented and that your website is functioning fine.
2. Merge Changes Manually Through cPanel
When you create a examination site manually, unfortunately, there's no automated process to merge your changes.
Here'southward what nosotros recommend:
While making changes on your test site, brand a note of each one. This way, you'll have a record of the changes you made and in which order. Alternatively, if you take an activity log enabled on your site, you can refer to it while making and testing changes on your live site.
To move changes from your examination site to your live site, login to the wp-admin panel of your live site. Refer to your alter log and recreate the steps one by one.
This method is time-consuming which is why we don't recommend it.
3. Merge Changes Using jurassic.ninja
Juraasic.ninja creates a dummy WordPress installation that has no connection to your live WordPress site. You lot tin use this site to try a new plugin or theme for WordPress, simply you won't know how they volition actually function on your live site.
Any changes yous make here, you will demand to manually recreate on your alive site.
That brings us to an end on creating a WordPress test site earlier going live. We're confident that you've learned how to fix up a test site and movement the changes to your alive site.
Final Thoughts
Making changes to your alive WordPress site tin can be nervus wracking as yous don't know how the changes volition affect your site.
From the steps detailed above, we can see that the manual method is fourth dimension-consuming and prone to mistakes. Plus, at that place's no selection to merge your changes with your alive site.
Information technology's much easier to use a WordPress Staging Plugin such as BlogVault that uses an automatic procedure. This makes creating and using a WordPress test site easier, faster, and much more efficient. If you want to build new site, exam it without affecting your quondam site, you can check out the guide on how to build new site while the old site is alive.
Create A WordPress Test Site With BlogVault!
Source: https://blogvault.net/wordpress-test-site/
Post a Comment for "Where Can I Upload Wordpress Free for Site Testing"